
Creating an Image Wave Transition
Hey everyone, my name is Izzy and in this short article I want to show you how you can crate a wave transition for an image in SwiftUI by using masks.
Prerequisites
- Mac with Xcode 13+ installed
- Experience in Swift programming is not necessary but can make your life easier
Create a New Project
Open up Xcode and create a new App project. If you are new to Xcode and app development you can follow the detailed steps I made in one of my other articles, like “Creating an Image Card in SwiftUI”. This article also contains a small section about the interface of Xcode to get you started.
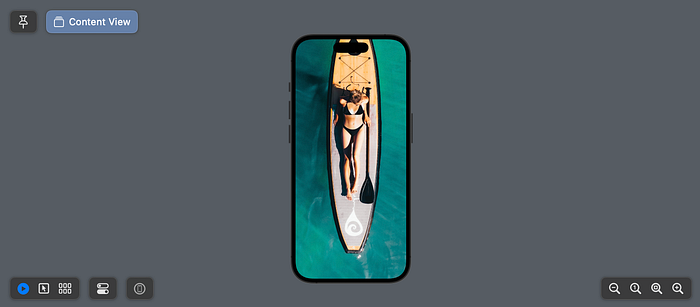
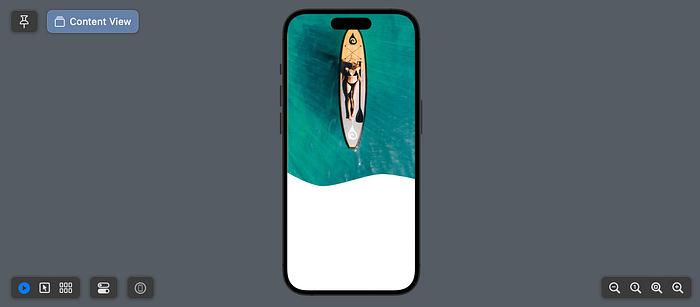
Final Design
For this tutorial this is an example that uses the wave transition which we want to create.

The easiest way of course would be just creating an image and cutting off the bottom part with Photoshop or Affinity. But what if we want to change the picture? Maybe even have multiple pictures that use the same wave and then editing them all? That seems very tedious, which is why we can just use masks.
Masks
The benefit of using a mask becomes very clear if you want to apply the same effect to multiple pictures. Instead of editing all the pictures if you want to change the look you can just change the mask image and voilà, the effect is applied to all.
Masks are often used in image editing software and follow a very simple idea. You take two images, a base image and a mask. The base image can be any image you like. The mask is usually a white & black or white & transparent image. Then the mask will basically put on top of the base image and everything that is white in the mask image will be shown. The below image demonstrates this with a nice waffle photo by Yuvraj Sachdeva:

Using Masks in SwiftUI
Now that we understand how masks work, let’s use this knowledge to create a wavy bottom for our image.
Adding Assets
First up we need the two images: the base image and the actual mask. For the base image I used an image from UnSplash, but you can use what ever image you would like. For the mask image I created a simple .png image in Affinity Designer.

- I used a simple curve with sharp corner points and smart points for the wavy part
- The curve has a white fill and the rest of the image is transparent
Once you have both files, add them to your Assets in XCode. To add them click on Assets in the left menu and then drag and drop both images underneath AppIcon and AccentColor. To reference the pictures in our code we now only need their names the way they appear in the Asset folder.
Images in SwiftUI
Adding an image in SwiftUI is super easy, simple add Image(“Base”) to the body of your view and the image should appear. If you named your image differently in the Asset folder make sure to replace “Base” with the name of your image.
var body: some View {
Image("Base")
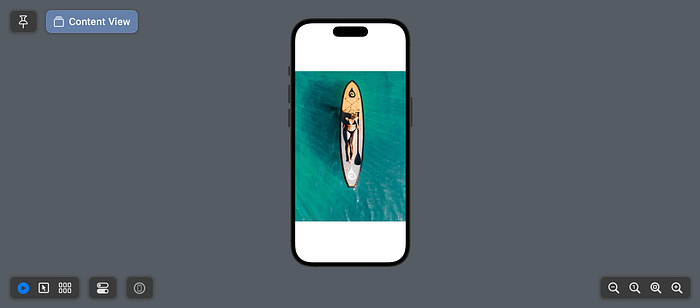
}Depending on the size of your image and orientation this might look a bit different and you might have some space around the image or it fills the screen like this:
Currently the picture fills the full screen and cuts of a few parts of the picture. We can fix that by, making the image resizable and then telling SwiftUI that we would like to make the image fit to the screen.
var body: some View {
  Image("Base")
    .resizable()
    .aspectRatio(contentMode: .fit)
}
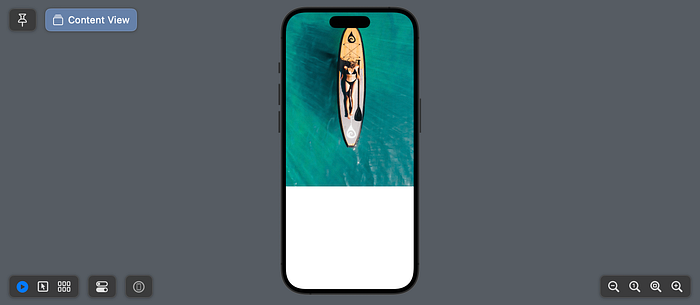
This looks a bit better but now we have big white spaces at the top and bottom. The space at the bottom is fine as this is the place where we would add some text later, but we want to remove the space at the top by moving the image up there. We can easily do this by adding the image inside a vertical stack and adding a spacer at the bottom that will push the image to the top. Then we just need to tell the image to ignore safe spaces at the top to push it completely to the top.
⌘ and click on the Image and select “Embed in VStack” and then add a Spacer() below the image to push it to the top. Add
.edgesIgnoringSafeArea(.top) to the image to also remove the last white space at the top.
var body: some View {
  VStack {
    Image("Base")
      .resizable()
      .aspectRatio(contentMode: .fit)
      .edgesIgnoringSafeArea(.top)
    Spacer()
  }
}
With that our image is now at the exact place where we wanted to have it and we can add our mask.
Masking Images
Masking an image in SwiftUI is very easy and we just have to watch out for a few things.
First lets add a mask to our current image by calling mask() on it and passing the second image to it. Again check how your mask image is called in the Asset file and use that name instead of “Mask”.
var body: some View {
  VStack {
    Image("Base")
      .resizable()
      .aspectRatio(contentMode: .fit)
      .edgesIgnoringSafeArea(.top)
      .mask(
          Image("Mask")
      )
    Spacer()
  }
}
After adding the code we can already see the effect of the mask, but it doesn’t fully look like you might expect. We have a white border around the image and all our effort of moving the original image in the correct position seem to have been for nothing.

But we can easily fix this! The reason this is happening that the mask image, similar to the base image in the beginning, just doesn’t know how and where it should be displayed. So lets use the same modifiers and make the mask resizable, fit to the content and ignore the top area:
var body: some View {
  VStack {
    Image("Base")
      .resizable()
      .aspectRatio(contentMode: .fit)
      .edgesIgnoringSafeArea(.top)
      .mask(
          Image("Mask")
            .resizable()
            .aspectRatio(contentMode: .fit)
            .edgesIgnoringSafeArea(.top)
      )
    Spacer()
  }
}
And that’s it already:
For the final design I just added some text and a custom button between the image and the spacer. If you want to learn how to make a custom button check out my other story: Custom Buttons in SwiftUI.
Thank you ❤️
Thank you for reading, I hope this was helpful! If you have any questions or suggestions, let me know in the comments.
And if you did enjoy this story please follow me for more stories! 😊
