
XCode 13 Tutorial
Hey everyone, my name is Izzy and in this short article I want to show you how you can integrate AdMob Rewarded Ads into your SwiftUI Project.
SwiftUI is getting better and better everyday, and I honestly love to use it. It makes writing Apps nearly to easy, until you have everything set up and you want to add some rewarded Ads to get some money. Google AdMob has normally some really good resources and Code example for setting this up, but if you check out the page for rewarded Ads you will see all example written in Objective-C 😑.

Alright, so the question is, how do we get that code snippet into our beautiful SwiftUI project and how can we interate it without the need of three coffees ☕.
Prerequesits
- Mac with XCode 13 installed
- CocoaPod installed (run
sudo gem install cocoapodsin the Terminal to install, more information on CocoaPods.org) - Experience in Swift programming not necessary but can make your life easier
What I will cover:
- How to prepare your project for Ads
- How to get back your
info.plistin XCode 13 - How to implement Rewarded Ads in SwiftUI
Preparing your Project for Ads
This is just a quick summary what you should have added to your project to get the Ads up and running. For more details on how to prepare your project for Ads, check out the official AdMob Guide.
Importing the Mobile Ads SDK
Open up a terminal and navigate to the root folder of your project (where you have a folder with your app name and the .xcodeproj file. The run the command pod init. This will create a Podfile as shown below:

Open up the Podfile and add pod 'Google-Mobile-Ads'to it. It should look similar to the below:
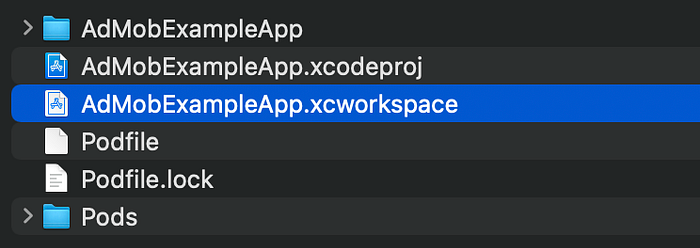
And back into the terminal just run pod install --repo-update, this should generate a lot of new files and folders so close XCode and then open up the newly created .xcworkspace file.
Update your Info.plist
If you follow the official AdMob Documentation this one is actually pretty straight forward, unless you have XCode 13 installed. If so you will notice that there isn’t a info.plist file anymore 😱.
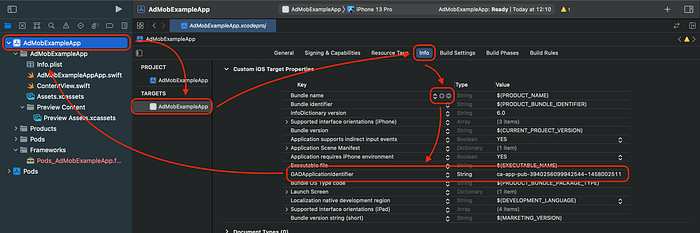
But we are lucky and we easily can get it back. First select your App Project ▸ Targets ▸ Info and then click on the little plus icon beside one of the entries to add the GADApplicationIdentifier key to the Custom iOS Target Properties. As a value you can add your own or use the testing one from Google: ca-app-pub-3940256099942544~1458002511. As soon as you add a new value the info.plist should show up in your project again 🤓.
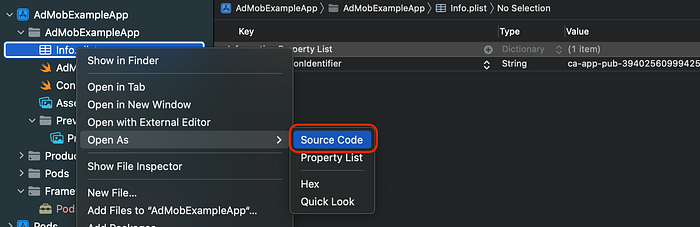
Besides the GADApplicationIdentifier we also need to add SKAdNetworkIdentifier to our info.plist. Instead of typing them all off, just open up the info.plist as source code and copy and paste the code from the Google AdMob page.
Initialize the Mobile Ads SDK
To initialize the Mobile Ads we just need to add one line of code to our project (line 20). I like to add it right in the beginning when our App becomes active. Don’t forget to import GoogleMobileAds!
Creating a RewardedAd
RewardedAd Class
Instead of explaining all the parts of the code, I will quickly just go over the most important parts. First of all, make sure to replace you Ad ID in line 2. Then the load() function is the one that tries to load a new Ad. This won’t show the ad but just request one and load it, so you can play it when you want. The import function is then the function you want to call in your SwiftUI file, to show the Ad, for example, when the user clicks a button.
The extension at the end just makes it easier getting the root view, but you can just copy and past that into your project.x
Adding the RewardedAd in SwiftUI
To add the Rewarded Ad in your SwiftUI file, just add a variable at the start (line 6) and load a new Ad (line 9–10). Then its just easy to call the showAd() (line 15–17) function and passing a function as parameter, what you want to do once the user finished watching the ad.
Example Project
I hope that the example above helps you displaying Rewarded Ads in your SwiftUI project. If you struggle integrating it into your own project, I create a example project to give you a project that is fully functional, to see how everything works together. You can download the project for a small coffee fee ☕️ on my Gumroad .
This small example project contains all the code and an example on how you can check if an Ad is available to watch. The project will show a small error message if no Ad is available for a few seconds and if the user watches the Ad it displays a diamond counter.

Additionally, I added a BannerAd class, with which you can easily add a banner ad to your app.
Troubleshooting
I sometime run into very strange and unexpected errors when I integrate AdMob into my app, which is why I usually add it when the project is nearly finished. If you run into some issues, a lot of times I just run pod install --repo-update again, which solves most of the problems.
Conclusion
If you add this to your app, make sure to replace the Ad ID in the info.plist and to also change the ID from the rewarded ad to your own, otherwise you won’t get any earnings.
And check out the Google documentation, on how to enable test ads on your device and how to ask the user for consent for ad tracking.
I hope this was a helpful tutorial, if you have any questions or if this was helpful, let me know in the comments 😊.
Download the code for the Ads from my GitHub repository here.
